Integrated tools
You can use any JDBC client to connect to your LeanXcale database.
1. How to use LeanXcale Loader
Lx-Loader is a component developed in java load from source data (jdbc,csv, json ) to the Leanxcale. Based on the reader and writer architecture, that is why this component implements different Readers and Writters. Configuration of lx-loader component will be described in Yalm files.
1.1. How to run
1.1.1. Standalone
Different configuration options are possible to run the lx-loader. As a minimum it is necessary to define the following as parameters (in JVM) , READER_CONFIG , WRITER_CONFIG and execute :
java -DREADER_CONFIG="readerConfigurationSample.yaml" -DWRITER_CONFIG="writerConfigurationSample.yaml"
-jar lx-loader-1.10-SNAPSHOT-jar-with-dependencies.jar
1.1.2. Integrated Software
To use the lx-loader , you have to first add the LeanXcale maven repository in your maven configuration.Include the next lines under the <repositories> tag of the pom.xml file:
<repositories>
  <repository>
    <id>lx-public</id>
    <url>https://artifactory.leanxcale.com/artifactory/lx-public/</url>
  </repository>
</repositories>
Then add the maven dependency under the <dependencies> tag in the same file:
<dependency>
  <groupId>com.leanxcale</groupId>
  <artifactId>lx-loader</artifactId>
  <version>2.0.0</version>
</dependency>
1.2. Reader
Reader is class whose purpose will load a data source. There are different types of "Readers" depending on the data source.
-
JdbcReader
-
GenericCSVReader
-
RandomReader
-
JsonReader
"Readers" have a common parameters and other specific properties depending on the data source:
1.2.1. Properties
The following table describes the common properties of a "Reader" class:
| Field | Type | Optional | Description |
|---|---|---|---|
type |
Following values are allowed : jdbc , csv, random, json , |
No |
This field represents the data source that the loader will use. |
scheduler_rate |
Number |
Yes |
Scheduler indicates how often the reader process is executed. Default value = -1 , scheduler will not be considered. |
execution_time |
Number |
Yes |
Maximum time to execute reader process, when the reading process is greater than this time, the process ends. Default value = -1 and execution time will not be considered. |
state_dir |
String |
Yes |
Directory execution state persistence.This parameter represents the directory where the information of the last execution is stored.If this parameter exists, the program checks if there is a file in this directory with the value "PENDING", which will indicate that the last load was wrong and stop the execution. |
filter |
List |
Yes |
More detailed information in the "Filter" table. |
1.2.2. JdbcReader
This reader will execute one or several queries and obtains the data that will be passed to the writer. Reader described below corresponds with "type=jdbc".
| Field | Type | Optional | Description |
|---|---|---|---|
url |
String |
No |
Defined by url where the db is running. Example : |
user |
String |
No |
Database user. |
password |
String |
No |
User’s password. |
driver |
String |
No |
Driver to connect to DB. Example : |
params_dir |
String |
Yes |
Files stored in this directory contains dinamyc value to execute de queries.This option can also be set without files, for this the query must contain the character '?'. <br/>Example : |
max_retries |
Number |
Yes |
Number of retries to connect de DB . By default, is 4. |
tables |
List |
No |
In "second level tags" , you can find more information about the required fields in JdbcReaderTables. |
Example:
reader:
  type: jdbc
  url: jdbc:leanxcale://localhost:1522/db
  user: APP
  password: APP
  driver: com.leanxcale.client.Driver
  batch: 100
  addNullWhenEmpty: false
  tables:
    - name: pto_80_test
      filter:
          - position : 4
            operator : =
            value : "#name"
            type : string
1.2.3. GenericCSVReader
This Reader type is charged of iterate on csv file that represents a table , and then the date will be loaded to destination (specified in "writer Yaml"). The reader described below corresponds with "type=csv".
Properties :
| Field | Type | Optional | Description |
|---|---|---|---|
tables |
List |
No |
In "second level tags" , you can find more information about the required fields in table CSVReaderTables. |
properties |
List |
Yes |
In "second level tags" , you can find more information about the required fields properties in CSVReaderProperties. |
Example:
reader:
type: csv
tables:
- name: servicios
files: src/test/resources/csv/servicios.csv
format: RFC4180
properties:
header: True
separator: ','
1.2.4. RandomReader
In this case, the data is not read from a source, but the data is randomly generated.To use this "reader" by setting "type : random" in the configuration file.
| Field | Type | Optional | Description |
|---|---|---|---|
tables |
List |
No |
Second level tags contains information about "CSVReaderProperties". |
Example:
reader:
type: random
tables:
- name: LOADERRANDOMTEST
  ntuples: 10
  columns:
- name: IDTEST
  type: INTEGER
  subtype: BIGINT
  min: 1
  distribution: INCREMENTAL

- name: NAME
  type: VARCHAR
  distribution: RANDOM
  min: 6
  max: 6

- name: NUMBER
  type: INTEGER
  distribution: RANDOM
  min: 10000
  max: 99999

- name: FLAG
  type: SMALLINT
  distribution: RANDOM
  min: 0
  max: 1

- name: TIMETEST
  type: TIMESTAMP
  distribution: RANDOM
  min: 2021-01-01 00:00:00.000
  max: 2022-09-31 00:00:00.000

- name: SMALLNUMBER
  type: SMALLINT
  distribution: RANDOM
  min: 1
  max: 9999
1.2.5. JsonReader
This reader load data from one or more json files. This reader corresponds with type="json" as indicated at the beginning of this section.
| Field | Type | Optional | Description |
|---|---|---|---|
name |
String |
No |
Table name. |
files |
List |
No |
List of files with Json format are processed to load the previous table. Example :
|
Example:
reader:
  type: json
  tables:
    - name: test
      files: [src/test/resources/json/alltypes_sample.json, src/test/resources/json/alltypes_sample_2.json]
1.3. Writer
These types of classes complement the functionality of the reader. Several types that are described in this section.
-
JdbcWriter
-
CSVWriter
-
TraceWriter
-
JdbcMulti
1.3.1. Properties
Writers are a class that will save data to the specified destination. Common properties :
| Field | Type | Optional | Description |
|---|---|---|---|
type |
Following values are allowed : jdbc, csv, trace, jdbcmulti. . |
No |
Type of writer where the loader will store the data. |
batch |
Number |
Yes |
SQL commands that are sent to the database server at once. |
addNullWhenEmpty |
Boolean |
Yes |
If addNullWhenEmpty was set to true adds null when field is empty. |
1.3.2. JdbcWriter
JDBC writer’s implementation that save the data according to configuration in yaml file. JdbcWriter corresponds with "type=jdbc" Following table defines properties.
| Field | Type | Optional | Description |
|---|---|---|---|
url |
String |
No |
Defined by url where the db is running. Example : |
user |
String |
No |
Database user. |
password |
String |
No |
User’s password. |
driver |
String |
No |
Driver to connect to DB. Example : |
batch |
Number |
Yes |
SQL commands that are sent to the database server at once. |
addNullWhenEmpty |
Boolean |
Yes |
if addNullWhenEmpty was set to true adds null when field is empty.By default is false. |
tsFormat |
String |
Yes |
Timestamp format. By default : yyyy-MM-dd HH:mm:ss.SSS |
tables |
List |
No |
"Second level tags" contains information about "JdbcwriterTables". |
Example:
writer:
  type: jdbc
  url: jdbc:leanxcale://localhost:1522/db
  user: APP
  password: APP
  tsFormat: yyyy-MM-dd HH:mm:ss
  driver: com.leanxcale.client.Driver
  batch: 1000
  addNullWhenEmpty: false
  tables:
    - name: LOADERRANDOMTEST
      create: true
      ddl:
        - CREATE TABLE IF NOT EXISTS LOADERRANDOMTEST (
          IDTEST BIGINT NOT NULL,
          NAME VARCHAR,
          NUMBER INTEGER,
          FLAG SMALLINT,
          TIMETEST TIMESTAMP,
          SMALLNUMBER SMALLINT,
          PRIMARY KEY (IDTEST))
1.3.3. CSVWriter
This "writer" writes data into a csv file and to use it you need to set it as type="csv". Following table defines properties.
| Field | Type | Optional | Description |
|---|---|---|---|
tables |
List |
No |
"Second level tags" contains information about "CSVWriterTables". |
properties |
List |
Yes |
"Second level tags" contains information about "CSVWriterProperties". Example: [source, yaml] ---- writer: type: csv tables: - name: ACH format: MySQL file: src/test/resources/CdC/bank1.mysql ---- |
1.3.4. TraceWriter
TraceWriter does not define singular properties and should be used for "test" and will print the result to the console. This writer is defined as follows:
writer:
  type: trace
1.3.5. JdbcMulti
A JDBC writer that unfold the data from a reader into multiple tables. It behaves like a normal jdbc writer but writes the same rows coming from reader into a collection of tables listed in yaml config file.
This scheme may be useful in parallel processing, temporal tables processing or replication of data in different tables. Tables do not have to be identical, but must have fields compatibles with those from the reader. For writing purposes, field types are fetched from the first table of list.
| Field | Type | Optional | Description |
|---|---|---|---|
tables |
List |
No |
List of name tables. |
Example:
writer:
  type: jdbcmulti
  tables:
    - name:
        - T1
        - T2
        - T3
1.4. Second level tags
1.4.1. Filter
Property that allows the functionality of establishing what values are passed from the reader to the writer.
| Field | Type | Optional | Description |
|---|---|---|---|
position |
Number |
No |
This number represents the position of the field to be filtered.Started position is 0. |
operator |
< ,>, = ,<> |
No |
Operator to compare. |
type |
int long float double string date time timestamp |
No |
Type of data to compare. |
value |
String |
No |
Value to compare with the reader data, if the format is '#name' it is compared with the file name. Example : |
format |
String |
Yes |
Format of time,date or timestamp. |
Example of filter definition :
filter:
- position : 2
  operator : '='
  value : "Notificaciones"
  type : string
1.4.2. JdbcReader Tables
| Field | Type | Optional | Description |
|---|---|---|---|
name |
String |
No |
Table name. |
query |
String |
No |
The Query that obtains data . If load_updated_params=true, this query is dynamic. See the example. |
params |
String |
Yes |
Params to execute dynamic query. If you want to set a dynamic parameter in a query, you must use the following syntax: |
fields |
String |
Yes |
Query with defined columns instead of getting all fields. Example : |
sequential |
Boolean |
Yes |
Run the queries in parallel if the value is true. By default , the property is false |
load_updated_params |
Boolean |
Yes |
By default , is false. if value is true , find the file in "params_dir" defined on "JdbcReader" table. |
security_margin |
Number |
Yes |
Security margin since the last copy. This value accepts a number in ms. By default, this property is 0. |
Example with dynamic values :
  tables:
    - name: JDBC_TABLE_EXAMPLE
      query: select * from JDBC_TABLE_EXAMPLE
      fields: #Optional. default copy all fields. specify a list here if you want just to copy some of them
Example with dynamic values :
  tables:
    - name: PTTB_PARTY
      query: select * from PTTB_PARTY where PTLASTUPDATEDDTTM > ?#PTLASTUPDATEDDTTM
      load_updated_params: True
      params:
        - TIMESTAMP'1800-08-03 00:00:00.000'
    - name: PTTB_ADDRESS
      query: select * from PTTB_ADDRESS where PTLASTUPDATEDDTTM > ?#PTLASTUPDATEDDTTM
      load_updated_params: True
      params:
        - TIMESTAMP'1800-08-03 00:00:00.000'
1.4.3. CSVReader Tables
| Field | Type | Optional | Description |
|---|---|---|---|
name |
String |
No |
Table name |
files |
String |
No |
List of file with csv files to load. |
nColumns |
Number |
Yes |
Set the number of columns. If this "nColumns" does not exist, it gets the value Header. When this "Header" does not exist , nColumns is first row. |
format |
String |
Yes |
Format of csv file . Example : |
move |
String |
Yes |
Directory where the files will be moved when they are processed. |
charset |
String |
Yes |
A charset or character set in full is essentially a set of characters recognized by the computer the same way the calculator can identify numbers. (ASCII,Unicode,UTF-8…) |
failOnError |
Boolean |
Yes |
Value that indicates how loader operates when the data contains errors.if value is true will break csv reading. By default is false, then continue the execution. |
replacer |
List |
Yes |
More information in "ReplacerCSVProperties" table. |
formatter |
List |
Yes |
Using to determine the format date or timestamp.More information in "Formatter CsvProperties" table. |
properties |
List |
Yes |
More information in "CSV Reader Properties" table. |
Example :
reader:
  type: csv
  tables:
    - name: csvWithErrors
        files: src/test/resources/CTest.csv
        format: Default
        charset: ISO-8859-1
        failOnError: true
1.5. Formatter CSVProperties
Set the format of date and timestamp columns in csv.
| Field | Type | Optional | Description |
|---|---|---|---|
field |
Number |
No |
Number of columns in csv. |
type |
Date Timestamp |
No |
Type of field. |
format |
String |
No |
Format of date or timestamp. By default : Date : yyyy-MM-dd . Timestamp : yyyy-MM-dd hh:mm:ss |
1.5.1. Replacer CSVProperties
Replaces every occurrence of a given character with a new character and returns a new string.
Field |
Type |
Optional |
Description |
field |
String |
No |
Number of columns in csv will be replaced according to source and target fields. |
source |
String |
No |
String will be removed and replace for target field. |
target |
String |
No |
New String that replace old source. |
Example csv configuration :
  tables:
    - name: servicios
      files: src/test/resources/csv/servicios.csv
      format: RFC4180
      charset: ISO-8859-1
      formatter:
        - field: 12
          type: date
          format: 'dd/MM/yyyy'
      replacer:
        - field: 0
          source: _N
          target: ~
1.5.2. CSVReader Properties
| Field | Type | Optional | Description |
|---|---|---|---|
header |
Boolean |
Yes |
If this property is true , rows contains name columns. By default, is false. |
separator |
String |
Yes |
Define character that separates columns.Depends on csv format. |
withTrim |
Boolean |
Yes |
True or false leading and trailing blank spaces from the column values. Depends on csv format. |
escape |
String |
Yes |
The Character used to escape special characters in values. Depends on csv format. |
quoteMode |
Boolean |
Yes |
Indicate if fields values is enclosed in quotes.Depends on csv format. |
nullString |
String |
Yes |
Convert value in null when reading records. |
Example :
reader:
  type: csv
  tables:
    - name: csvWithErrors
        files: src/test/resources/example.csv
        format: Default
        charset: ISO-8859-1
        failOnError: true
        properties:
        header: true
        separator: ';'
        nullString: ''
1.5.3. RandomReader Tables
| Field | Type | Optional | Description |
|---|---|---|---|
name |
String |
No |
Table name. |
ntuples |
Number |
No |
Number of records are created by Reader. |
columns |
List |
No |
Columns "RandomReader Tables" show details about this field. |
Example :
  reader:
    type: random
    tables:
    - name: LOADERRANDOMTEST
      ntuples: 10
      columns:
        - name: IDTEST
          type: INTEGER
          subtype: BIGINT
          min: 1
          distribution: INCREMENTAL
        - name: NAME
          type: VARCHAR
          distribution: RANDOM
          min: 6
          max: 6
1.5.4. RandomReader Columns
| Field | Type | Optional | Description |
|---|---|---|---|
name |
String |
No |
Column name. |
type |
Following text are allowed : INTEGER,LONG,VARCHAR,SMALLINT,BIGINT,DOUBLE,ARRAY,TIMESTAMP,DATE,TIME |
Yes |
Random data type |
subtype |
Following text are allowed : BIGINT,LONG,STRING |
Yes |
If type is ARRAY it is mandatory this value |
distribution |
Following text are allowed : RANDOM,INCREMENTAL,RANDOM_ROW , CATALOG |
Yes |
Type of random values: RANDOM:values are random. INCREMENTAL:values increments according to step values. RANDOM_ROW CATALOG:Values are defined in same yalm or another file. |
catalog |
File or Yalm configuration |
Yes |
if distribution is catalog, you could get the catalog data defined in a File or YAML config |
min |
Number |
Yes |
Minimum allowed value . If type is VARCHAR represents minimum length string. |
max |
Number |
Yes |
Maximum allowed value . If type is VARCHAR represents maximum length string. |
nullPercent |
Number |
Yes |
Inserts a percentage of null values |
minLength |
Number |
Yes |
Minimum length of the defined field, it could be for example the minimum number of elements of an array. |
maxLength |
Number |
Yes |
Maximum length of the defined field, it could be for example the maximum number of elements of an array. |
step |
Number |
Yes |
It is used to increment timestamps, dates or times fields and distribution is defines such as incremental. |
Example: This configuration generates table with 111 records and columns defined:
 - name: pto_80_test
     ntuples: 111
     columns:
       - name: SEQ_NUM
         type: DOUBLE
         distribution: RANDOM
         min: 1
         max: 99999
         nullPercent: 100

       - name: SERVICIOSID
         type: ARRAY
         subtype: BIGINT
         distribution: CATALOG
         catalog: [1,2,3,24,176]
         minLength: 1
         maxLength: 2

       - name: ISMTPORT
         type: BOOLEAN
         distribution: RANDOM

       - name: OPERADORA
         type: VARCHAR
         distribution: CATALOG
         catalog: ["Digitel", "Movilnet", "Movistar"]

       - name: NUM_DEST
         type: VARCHAR
         distribution: CATALOG
         catalog: ["584267806550","584267832100","584267866850","584267881184","584267892212","584267908171","584267938649","584267955713","584267967417","584267970563","584267976080","584267986845","584268000291","584268020690","584268028635","584268030078","584268039652"]

       - name: NUM_ORIG # Not null
         type: VARCHAR
         distribution: CATALOG
         catalog: ["100102", "101100102", "N/A"]

       - name: MESSAGE # Not null
         type: VARCHAR
         distribution: RANDOM
         min: 0
         max: 200

       - name: FECHA_ENV # Not null, pto_80_test
         type: TIMESTAMP
         distribution: INCREMENTAL
         min: 2020-10-01 00:00:00.000
         step: 4848

       - name: CANT_MEN
         type: INTEGER
         distribution: RANDOM
         min: 1
         max: 10

       - name: ESTATUS_ACK
         type: VARCHAR
         distribution: CATALOG
         catalog: ["ESME_ROK", "ermd-02"]
         nullPercent: 50

       - name: FECHA_ACK
         type: DATE
         distribution: RANDOM
         min: 2010-01-01
         max: 2022-09-28

       - name: PUERTO # Not null
         type: INTEGER
         distribution: CATALOG
         catalog: [8000, 8001,8002,8003,8006,8010,8000, 8001,8002,8003,8006,8010,8000, 8001,8002,8003,8006,8010,8011,8015,8019,8021,8034,8045,8056,8064, 8099]
1.5.5. KiviReader Tables
| Field | Type | Optional | Description |
|---|---|---|---|
name |
String |
No |
Table name. |
fields |
List of string |
Yes |
Specify a list here if you want just to copy some of them . Default copy all fields. |
Example of kivi configuration :
  tables:
    - name: KIVI_TEST
      fields: [ID, PROP_1, PROP_3, PROP_6, PROP_25, PROP_28]
1.6. JdbcWriter Tables
| Field | Type | Optional | Description |
|---|---|---|---|
name |
String |
No |
Table name. |
create |
Boolean |
Yes |
If value = true , first execute sql query defined in ddl property. By default is false, and insert data. |
ddl |
String |
Yes |
If the previous field is true, this field indicates the ddl needed to create the tables. |
type: jdbc

writer:
url: lx://localhost:1529/db
user: APP
password: APP
driver: com.leanxcale.client.Driver
batch: 10
addNullWhenEmpty: false

tables:
- name: RAND_TO_JDBC_TEST
create: false
The following example is interesting because the table is created and then the data is inserted.
- name: ADDRESSTYPES
  fields: [addresstype, description, versionnum, ubcodetype]
  create: True
  ddl:
  - DROP TABLE IF EXISTS ADDRESSTYPES
  - CREATE TABLE IF NOT EXISTS ADDRESSTYPES (
    ADDRESSTYPE VARCHAR(5) NOT NULL,
    DESCRIPTION VARCHAR(100),
    VERSIONNUM INTEGER,
    UBCODETYPE VARCHAR(5),
    DT_LAST_MODIFICATION TIMESTAMP NOT NULL DEFAULT CURRENT_TIMESTAMP,
    PRIMARY KEY (ADDRESSTYPE))
1.7. CSVWriter
1.7.1. CSVWriter Tables
| Field | Type | Optional | Description |
|---|---|---|---|
format |
String |
Yes |
Format of csv file |
files |
String |
No |
Directory where the files will be moved when they are processed. |
charset |
String |
Yes |
A charset or character set in full is essentially a set of characters recognized by the computer the same way the calculator can identify numbers. (ASCII,Unicode,UTF-8…) |
properties |
List |
Yes |
More information in "CSVWriterProperties tables". |
1.7.2. CSVWriter Properties
| Field | Type | Optional | Description |
|---|---|---|---|
header |
Boolean |
Yes |
Value is true if first rows contains name columns.By default, this property is false. |
separator |
String |
Yes |
Defines character that separates columns.Depends on csv format. |
withTrim |
Boolean |
Yes |
true or false leading and trailing blank spaces from the column values.Depends on csv format. |
escape |
String |
Yes |
The Character used to escape special characters in values. Depends on csv format. |
quoteMode |
Boolean |
Yes |
Indicate if fields value is enclosed in quotes.Depends on csv format. |
nullString |
String |
Yes |
Convert values in null when reading records. |
writer:
type: csv
tables:
- name: PARTY
format: RFC4180
file: src/test/resources/prod/simulation/PARTY.tbl
properties:
quoteMode: ALL
- name: ADDRESS
format: RFC4180
file: src/test/resources/prod/simulation/ADDRESS.tbl
properties:
quoteMode: ALL
- name: ADDRESSLINK
format: RFC4180
file: src/test/resources/prod/simulation/ADDRESSLINK.tbl
properties:
quoteMode: ALL
1.8. Examples
Different configurations are allowed and make this component a very powerful tool. Following examples with different readers and writers configurations.
1.8.1. Jdbc to Jdbc
reader:
  type: jdbc
  scheduler_rate: -1
  url: jdbc:leanxcale://5eb1233755aea1792c45.lxc-db.com:1522/db
  user: APP
  password: APP
  driver: com.leanxcale.client.Driver

  tables:
    - name: JDBC_TO_JDBC_TEST
      query: select * from JDBC_TO_JDBC_TEST
      params: ##optional. list required when query has params
      #fields: #Optional. default copy all fields. specify a list here if you want just to copy some of them


writer:
  type: jdbc
  url: jdbc:leanxcale://localhost:1529/db
  user: APP
  password: APP
  driver: com.leanxcale.client.Driver
  batch: 10
  addNullWhenEmpty: false

  tables:
    - name: JDBC_TO_JDBC_TEST_OUT
      create: false
      #ddl: #optional. required when create is true
1.8.2. Json to Jdbc
reader:
type: json
tables:
- name: test
files: [src/test/resources/json/alltypes_sample.json, src/test/resources/json/alltypes_sample_2.json]

writer:
type: jdbc
url: jdbc:leanxcale://5eb1233755aea1792c45.lxc-db.com:1522/db
user: APP
password: APP
batch: 1
addNullWhenEmpty: true

tables:
- name: json_to_jdbc
create: true
ddl: "create table if not exists json_to_jdbc(
textField varchar(16),
booleanField boolean,
intField integer,
doubleField double,
arrayField bigint array,
nodeField varchar array)"
1.8.3. Csv to Trace with filter
reader:
type: csv
tables:
- name: filterTest
files: src/test/resources/Filter/CsvFilterToDummyTest/20221028.csv
properties:
separator: ','
header: True
filter:
- position : 2
operator : '>'
type : date
value : '2019-03-02'
format : "yyyy-MM-dd"

writer:
type: trace
tables:
- name: filterTest
2. LeanXcale Glue integration
This document is a practical guide on how to connect Glue with LeanXcale using LeanXcale’s JDBC driver.
Glue offers several connections mode: JDBC, Athena and Spark. At the moment of writing this guide, only JDBC connection is available.
2.1. Upload JDBC driver to S3
Glue needs to have access to the particular JDBC driver, so it is required to upload it to S3.
The driver can be downloaded from LeanXcale Drivers page.
| Make sure that the uploaded driver has public access, or the right permissions to be available for the Glue role. It may also be required to set public the bucket containing the driver. |
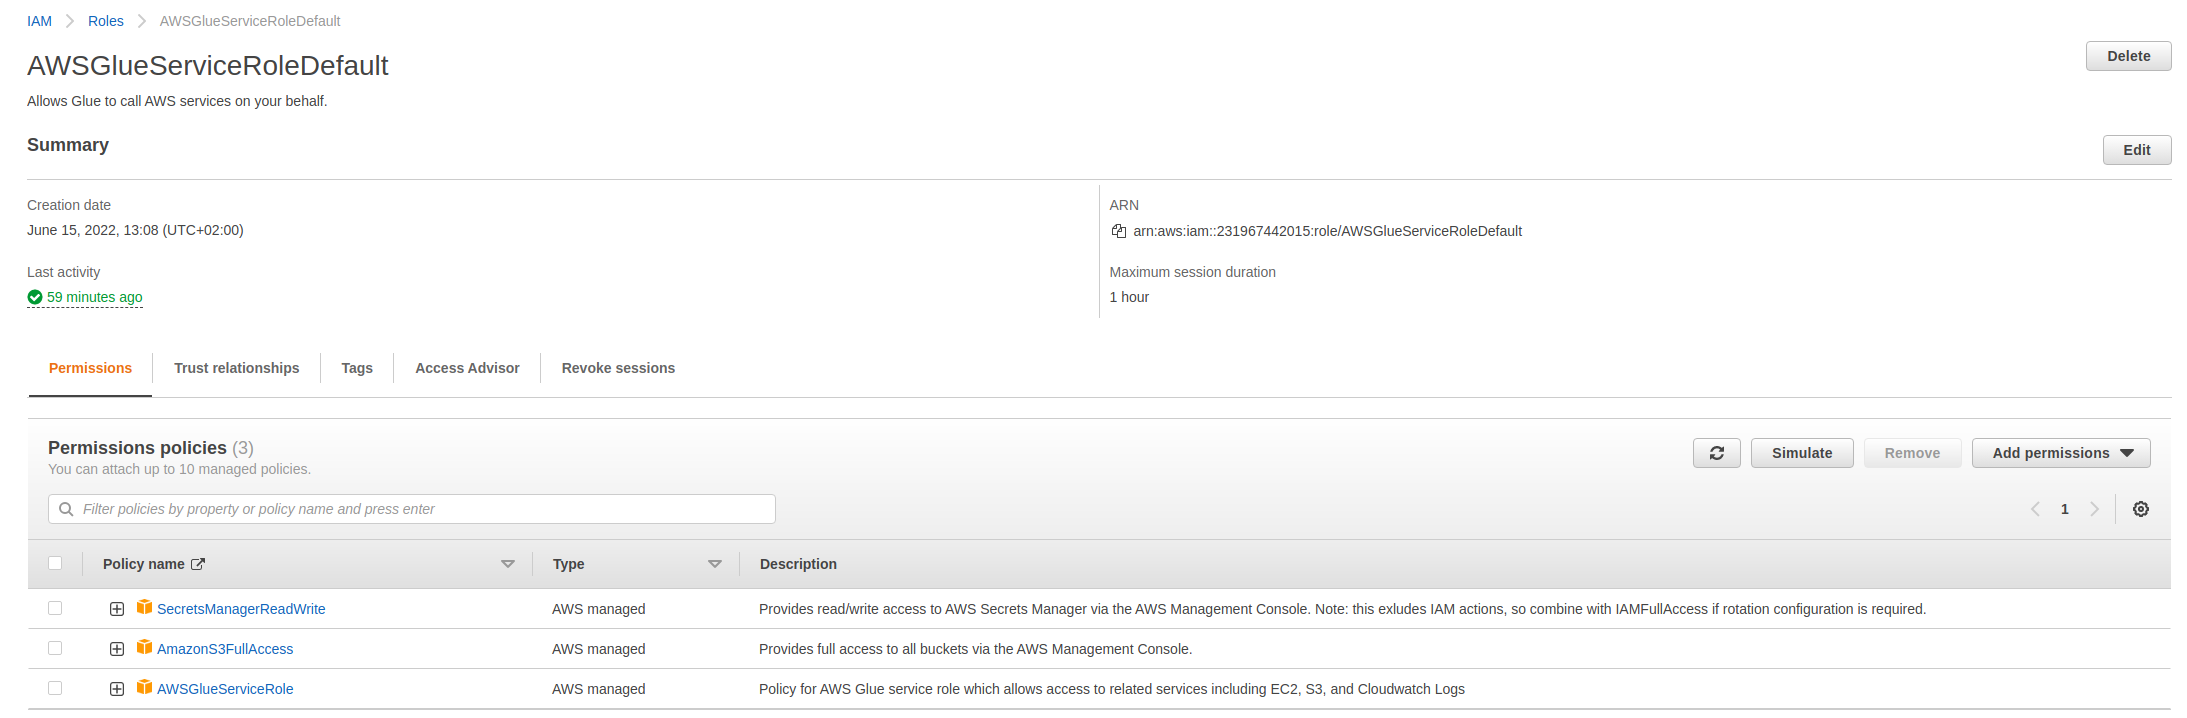
2.2. Create IAM Role for Glue jobs
You need to create a role which has permission to read from this S3 bucket, write to a destination S3 bucket and run AWS Glue jobs. A possible configuration can be the following:
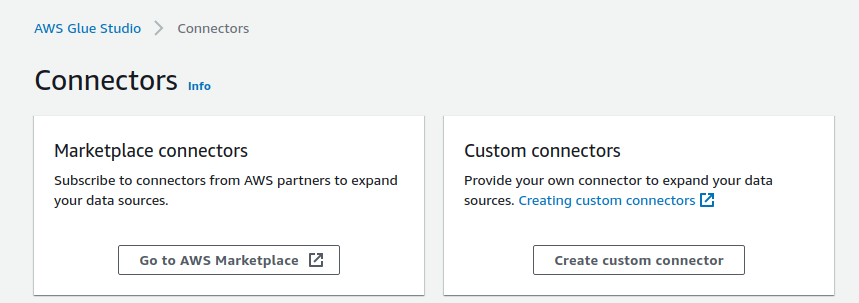
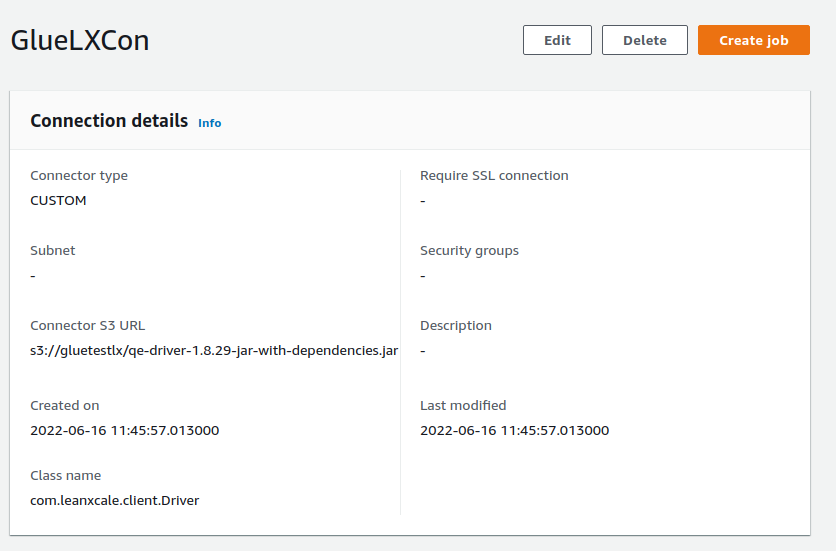
2.3. Create connector
First of all, you will need to create a custom connector.
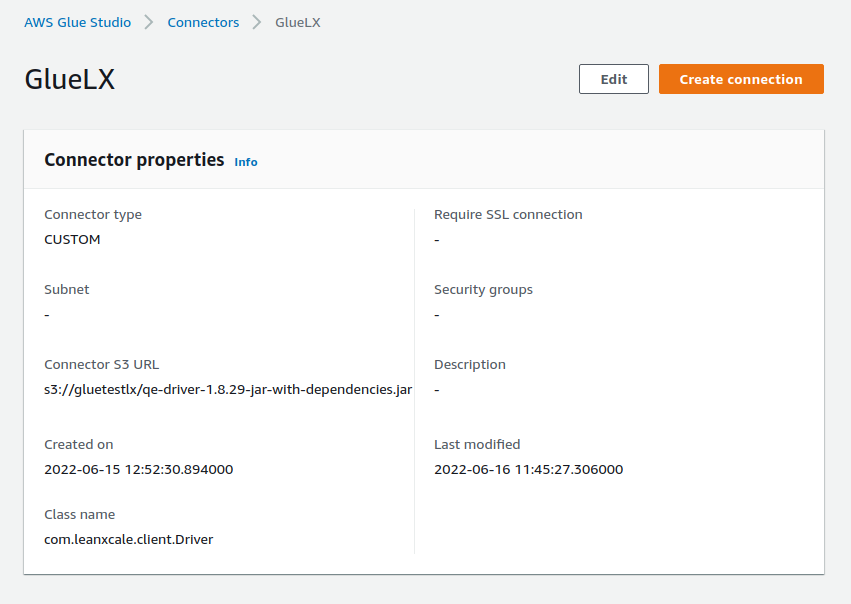
Configure the following points:
-
Connector S3 URL: Enter the S3 location where the LeanXcale’s JDBC driver was uploaded.
-
Name: Enter a name for you connector.
-
Connector type: Choose JDBC.
-
Class name: Set com.leanxcale.client.Driver
-
JDBC URL base: jdbc:leanxcale://<your LX isntance address\>:1522/<your db\>
-
URL parameter delimiter: Use semicolon.
Now, click Create connector.
2.4. Create connection
After creating the connector now it is time for creating a connection. In the connectors page having selected the connector, choose Create connection.
Configure the following fields for the connection:
-
Connection credential type: Choose default.
-
AWS Secret: Here, you will need to create a secret in the AWS Secrets Manager and select it here. Our example is the following.
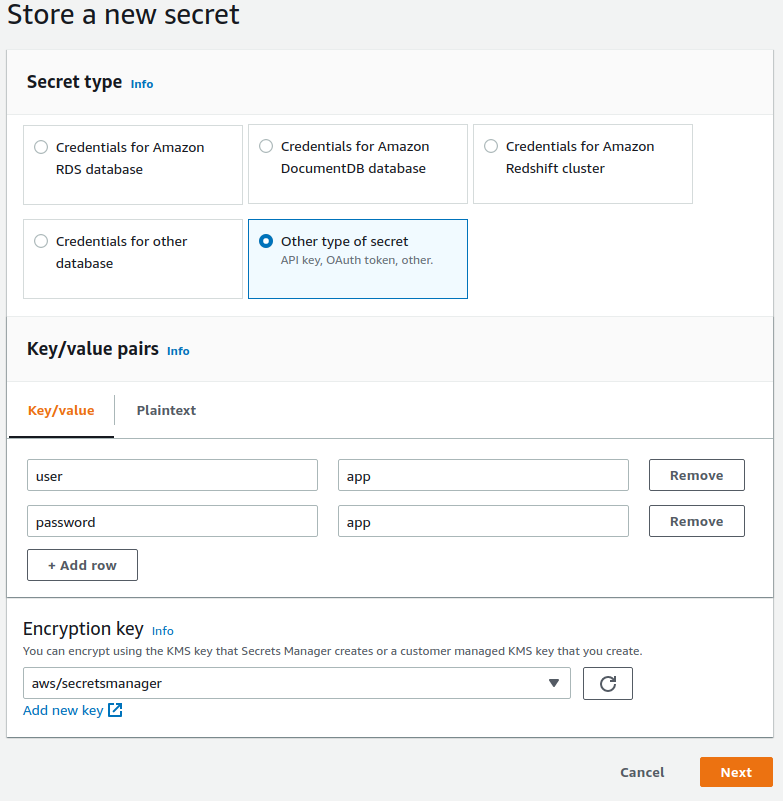
Now choose a name and enter an optional description and after creation, select this secret in the connection’s selector.
-
Additional URL parameters: Here we will add the user and password also, setting it up in the following way:
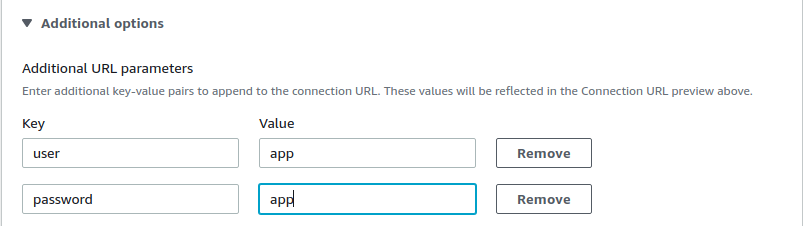
Choose Create connection.
2.5. Create a Job
With the connector and the connection already setup, we can now create a Glue job to interact with our Lx instance. This will be a basic example on reading an storing data from one table to another using LX for both operations.
The setup consists of two tables already created in LX with only one field.
The SQL to recreate the scenario is the following:
CREATE TABLE Persons (
ID int NOT NULL,
PRIMARY KEY (ID));
CREATE TABLE Persons2 (
ID2 int NOT NULL,
PRIMARY KEY (ID2));
INSERT INTO Persons (ID) values (1);
INSERT INTO Persons (ID) values (2);
INSERT INTO Persons (ID) values (3);
INSERT INTO Persons (ID) values (4);
INSERT INTO Persons (ID) values (5);
INSERT INTO Persons (ID) values (6);
INSERT INTO Persons (ID) values (7);
INSERT INTO Persons (ID) values (8);
INSERT INTO Persons (ID) values (9);
INSERT INTO Persons (ID) values (10);
INSERT INTO Persons (ID) values (11);
INSERT INTO Persons (ID) values (12);
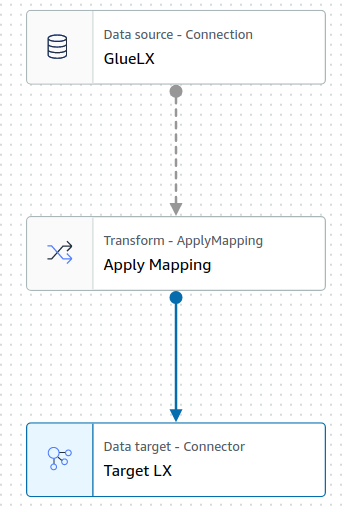
select * from Persons;From the connectors → connection dashboard, choose Create job.
The visual representation of the job has the following structure:
2.6. Job Details
Time for configuring the Glue job:
-
IAM Role: Select here the role previously created with the right permissions (permission over the S3 JDBC driver).
-
For the rest options, we configure them as following.
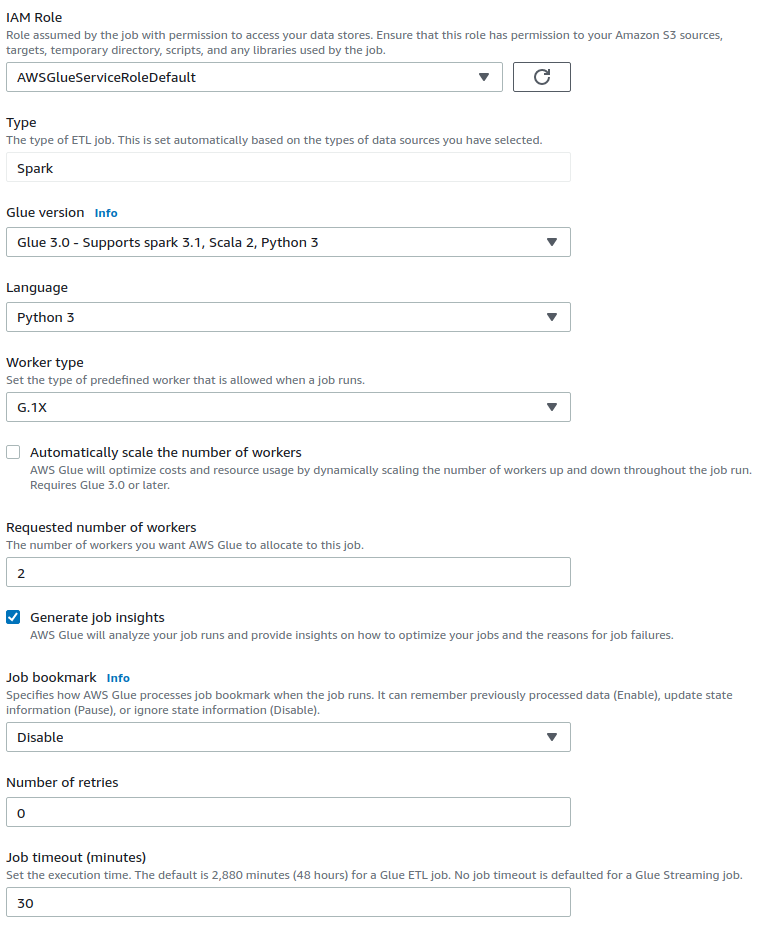
Execution congifuration can be adapted according to requirements. For this case, they are dimensioned for onyl a functional test.
Once the Job Details have been configured, we can go on and configure the different nodes on the job from the Visual panel.
2.7. Data source configuration
For the configuration of the data source, we add a source node and configure it as following.

We could also select the write a query option and, for example, select all the fields from the table by using select * from Persons.
Also, you need to configure manually the schema the node outputs, as it will be used for the following nodes. In this case, it is just a single int field named ID.

We can add more fields to the output schema by clicking on add root key.
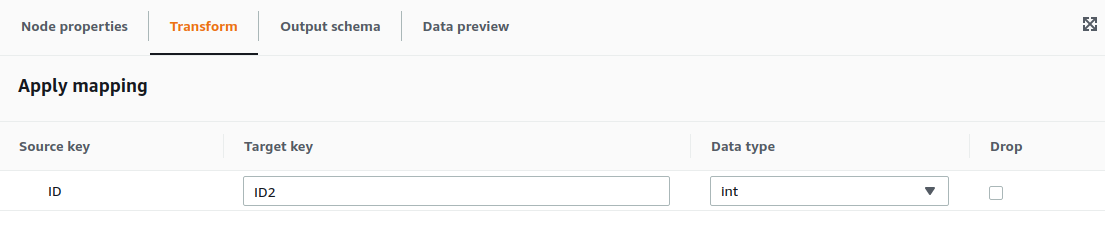
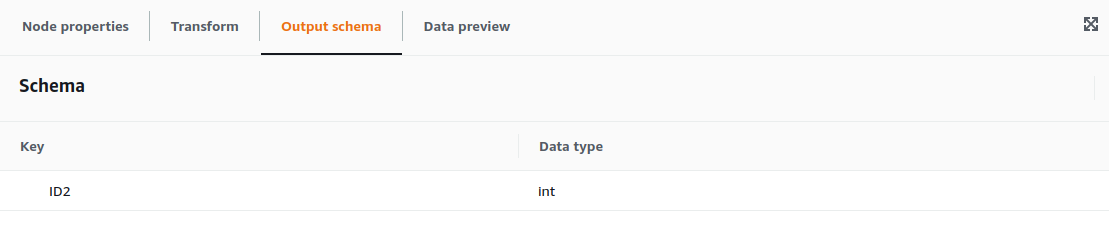
2.8. Mapping configuration
For the example, we are going to select the contents of Persons.ID and place them on Persons2.ID2. For configuring the Mapping transformation we only need the configure the parent node and the transformation required, as well as the output schema.
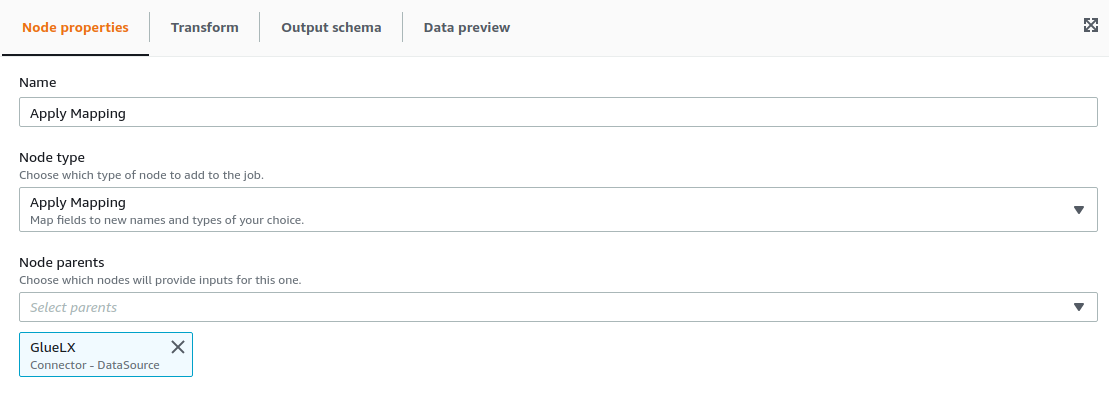
2.9. Data target configuration
For the data target, we choose to save the data back in LeanXcale in the Persons2 table, so the configuration would as follows:
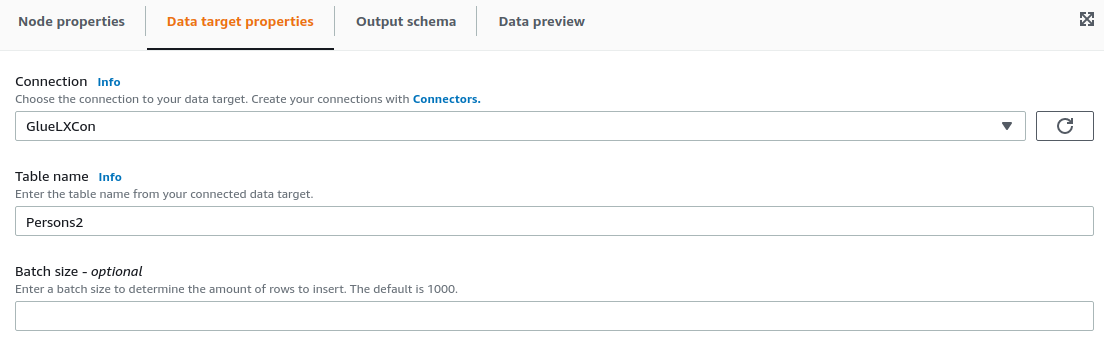

After this configuration we should be able to run the job and access the logs in the Runs panel and check in LeanXcale instance that the data is moved correctly. :sectnums:
3. OData Connector
LeanXcale provides a standard OData connector OData that is disabled by default. It can be configured in the On Cloud deployments
LeanXcale implements the version v4.5 of the OData standard implementing the Apache Olingo interfaces.
OData is an standard interface to access and query data. In the following example it is shown how to use it with the Apache Olingo Client dependency for the OData interface. It requires the table CAR created without any data to run. It inserts some rows, access them and modify some of them.
CREATE TABLE CAR (
     CarID INTEGER,
     CarYear INTEGER,
     CarTrade VARCHAR,
     CarNumber VARCHAR,
     PRIMARY KEY (CarID)
)
The source code of an example project can be downloaded from this public repository. It is a maven project with the source code to use it as an example.
This is the pom.xml file importing the olingo client dependency
<?xml version="1.0" encoding="UTF-8"?>
<project xmlns="http://maven.apache.org/POM/4.0.0" xmlns:xsi="http://www.w3.org/2001/XMLSchema-instance" xsi:schemaLocation="http://maven.apache.org/POM/4.0.0 http://maven.apache.org/xsd/maven-4.0.0.xsd">
  <modelVersion>4.0.0</modelVersion>
  <groupId>com.leanxcale</groupId>
  <artifactId>olingo-client-example</artifactId>
  <version>0.0.1-SNAPSHOT</version>

  <packaging>jar</packaging>
  <properties>
    <project.build.sourceEncoding>UTF-8</project.build.sourceEncoding>
    <maven.compiler.source>11</maven.compiler.source>
    <maven.compiler.target>11</maven.compiler.target>
  </properties>
  <dependencies>
    <dependency>
      <groupId>org.apache.olingo</groupId>
      <artifactId>odata-client-core</artifactId>
      <version>4.5.0</version>
    </dependency>
  </dependencies>
</project>
This is the Java source code to insert, get and modify some rows in the CAR table.
import java.io.ByteArrayInputStream;
import java.io.InputStream;
import java.net.URI;
import org.apache.olingo.client.api.ODataClient;
import org.apache.olingo.client.api.communication.request.cud.ODataDeleteRequest;
import org.apache.olingo.client.api.communication.request.cud.ODataEntityCreateRequest;
import org.apache.olingo.client.api.communication.request.cud.ODataEntityUpdateRequest;
import org.apache.olingo.client.api.communication.request.cud.UpdateType;
import org.apache.olingo.client.api.communication.request.retrieve.ODataEntityRequest;
import org.apache.olingo.client.api.communication.request.retrieve.ODataEntitySetIteratorRequest;
import org.apache.olingo.client.api.communication.response.ODataDeleteResponse;
import org.apache.olingo.client.api.communication.response.ODataEntityCreateResponse;
import org.apache.olingo.client.api.communication.response.ODataEntityUpdateResponse;
import org.apache.olingo.client.api.communication.response.ODataRetrieveResponse;
import org.apache.olingo.client.api.domain.ClientEntity;
import org.apache.olingo.client.api.domain.ClientEntitySet;
import org.apache.olingo.client.api.domain.ClientEntitySetIterator;
import org.apache.olingo.client.api.serialization.ODataDeserializerException;
import org.apache.olingo.client.core.ODataClientFactory;
import org.apache.olingo.commons.api.format.ContentType;

public class Main {

  private static final String SERVICE_URL = "http://localhost:8900/kivi";

  private static final String[] carsToInsert = new String[]{
      "{\"CARID\":1,\"CARYEAR\":1984,\"CARTRADE\":\"Mazda\",\"CARNUMBER\":\"IX3443\"}",
      "{\"CARID\":2,\"CARYEAR\":2002,\"CARTRADE\":\"Mazda\",\"CARNUMBER\":\"IX3443\"}",
      "{\"CARID\":3,\"CARYEAR\":2022,\"CARTRADE\":\"Mazda\",\"CARNUMBER\":\"IX3443\"}",
      "{\"CARID\":4,\"CARYEAR\":1983,\"CARTRADE\":\"Mazda\",\"CARNUMBER\":\"IX3443\"}",
      "{\"CARID\":5,\"CARYEAR\":1999,\"CARTRADE\":\"Toyota\",\"CARNUMBER\":\"IX3443\"}",
      "{\"CARID\":6,\"CARYEAR\":2008,\"CARTRADE\":\"Toyota\",\"CARNUMBER\":\"IX3443\"}",
      "{\"CARID\":7,\"CARYEAR\":2018,\"CARTRADE\":\"Toyota\",\"CARNUMBER\":\"IX3443\"}",
      "{\"CARID\":8,\"CARYEAR\":2016,\"CARTRADE\":\"Ferrari\",\"CARNUMBER\":\"IX3443\"}",
      "{\"CARID\":9,\"CARYEAR\":2021,\"CARTRADE\":\"Ferrari\",\"CARNUMBER\":\"IX3443\"}",
      "{\"CARID\":10,\"CARYEAR\":2022,\"CARTRADE\":\"Datsun\",\"CARNUMBER\":\"IX3443\"}"};

  private static final String carToUpdate = "{\"CARID\":10,\"CARTRADE\":\"Ferrari\"}";

  /**
     there is a table defined as
     CREATE TABLE CAR (
        CarID INTEGER,
        CarYear INTEGER,
        CarTrade VARCHAR,
        CarNumber VARCHAR,
        PRIMARY KEY (CarID))
   */

  public static void main(String[] args) {

    try {
      ODataClient odataClient = ODataClientFactory.getClient();
      odataClient.getConfiguration().setDefaultPubFormat(ContentType.APPLICATION_JSON);
      final String entitySetName = "Cars";

      //insert some cars
      for (int i = 0; i < 10; i++) {
        ClientEntity loadEntity = loadEntity(odataClient, carsToInsert[i]);
        URI absoluteUriImport = odataClient.newURIBuilder(SERVICE_URL).appendEntitySetSegment(entitySetName).build();
        ODataEntityCreateRequest<ClientEntity> requestCreate = odataClient.getCUDRequestFactory().getEntityCreateRequest(absoluteUriImport,
            loadEntity);
        requestCreate.setAccept("application/json");
        ODataEntityCreateResponse<ClientEntity> responseCreate = requestCreate.execute();
        responseCreate.getBody();
        System.out.println("entry loaded " + carsToInsert[i]);
      }

      //read everything from a table
      URI absoluteUri = odataClient.newURIBuilder(SERVICE_URL).appendEntitySetSegment(entitySetName).build();
      System.out.println("URI = " + absoluteUri);
      ODataEntitySetIteratorRequest<ClientEntitySet, ClientEntity> request =
          odataClient.getRetrieveRequestFactory().getEntitySetIteratorRequest(absoluteUri);
      request.setAccept("application/json");
      ODataRetrieveResponse<ClientEntitySetIterator<ClientEntitySet, ClientEntity>> response = request.execute();
      ClientEntitySetIterator<ClientEntitySet, ClientEntity> responseIterator = response.getBody();
      while (responseIterator.hasNext()) {
        printResult(responseIterator.next());
      }

      //read entity by key
      Integer keyValue = 1;
      absoluteUri = odataClient.newURIBuilder(SERVICE_URL).appendEntitySetSegment(entitySetName).appendKeySegment(keyValue).build();
      System.out.println("URI = " + absoluteUri);
      ODataEntityRequest<ClientEntity> entityRequest = odataClient.getRetrieveRequestFactory().getEntityRequest(absoluteUri);
      request.setAccept("application/json");
      ODataRetrieveResponse<ClientEntity> entityResponse = entityRequest.execute();
      ClientEntity clientEntity = entityResponse.getBody();

      printResult(clientEntity);

      //read entities by filter
      absoluteUri = odataClient.newURIBuilder(SERVICE_URL).appendEntitySetSegment(entitySetName).filter("CARTRADE eq 'Ferrari'").build();
      System.out.println("URI = " + absoluteUri);
      request = odataClient.getRetrieveRequestFactory().getEntitySetIteratorRequest(absoluteUri);
      request.setAccept("application/json");
      response = request.execute();
      responseIterator = response.getBody();
      while (responseIterator.hasNext()) {
        printResult(responseIterator.next());
      }

      //read again car10
      keyValue = 10;
      absoluteUri = odataClient.newURIBuilder(SERVICE_URL).appendEntitySetSegment(entitySetName).appendKeySegment(keyValue).build();
      System.out.println("URI = " + absoluteUri);
      entityRequest = odataClient.getRetrieveRequestFactory().getEntityRequest(absoluteUri);
      request.setAccept("application/json");
      entityResponse = entityRequest.execute();
      clientEntity = entityResponse.getBody();
      printResult(clientEntity);

      //update car10 with patch (it will only update the values in the input clientEntity
      ClientEntity updateEntity = loadEntity(odataClient, carToUpdate);
      absoluteUri = odataClient.newURIBuilder(SERVICE_URL).appendEntitySetSegment(entitySetName).appendKeySegment(keyValue).build();
      ODataEntityUpdateRequest<ClientEntity> requestUpdate = odataClient.getCUDRequestFactory().getEntityUpdateRequest(absoluteUri,
          UpdateType.PATCH, updateEntity);
      requestUpdate.setAccept("application/json;odata.metadata=minimal");
      ODataEntityUpdateResponse<ClientEntity> responseUpdate = requestUpdate.execute();
      System.out.println("Response code: " + responseUpdate.getStatusCode());

      //read now again car10
      absoluteUri = odataClient.newURIBuilder(SERVICE_URL).appendEntitySetSegment(entitySetName).appendKeySegment(keyValue).build();
      System.out.println("URI = " + absoluteUri);
      entityRequest = odataClient.getRetrieveRequestFactory().getEntityRequest(absoluteUri);
      request.setAccept("application/json");
      entityResponse = entityRequest.execute();
      clientEntity = entityResponse.getBody();
      printResult(clientEntity);

      //update car10 with PUT (it will upsert the values in the input clientEntity. missing values in the clientEntity will be 'null'
      updateEntity = loadEntity(odataClient, carToUpdate);
      absoluteUri = odataClient.newURIBuilder(SERVICE_URL).appendEntitySetSegment(entitySetName).appendKeySegment(keyValue).build();
      requestUpdate = odataClient.getCUDRequestFactory().getEntityUpdateRequest(absoluteUri, UpdateType.REPLACE, updateEntity);
      requestUpdate.setAccept("application/json;odata.metadata=minimal");
      responseUpdate = requestUpdate.execute();
      System.out.println("Response code: " + responseUpdate.getStatusCode());

      //read now again car10
      absoluteUri = odataClient.newURIBuilder(SERVICE_URL).appendEntitySetSegment(entitySetName).appendKeySegment(keyValue).build();
      System.out.println("URI = " + absoluteUri);
      entityRequest = odataClient.getRetrieveRequestFactory().getEntityRequest(absoluteUri);
      request.setAccept("application/json");
      entityResponse = entityRequest.execute();
      clientEntity = entityResponse.getBody();
      printResult(clientEntity);

      //delete now car10
      absoluteUri = odataClient.newURIBuilder(SERVICE_URL).appendEntitySetSegment(entitySetName).appendKeySegment(keyValue).build();
      ODataDeleteRequest requestDelete = odataClient.getCUDRequestFactory().getDeleteRequest(absoluteUri);
      requestDelete.setAccept("application/json;odata.metadata=minimal");
      ODataDeleteResponse responseDelete = requestDelete.execute();
      System.out.println("Response code: " + responseDelete.getStatusCode());

      //try to read again car10
      try {
        absoluteUri = odataClient.newURIBuilder(SERVICE_URL).appendEntitySetSegment(entitySetName).appendKeySegment(keyValue).build();
        System.out.println("URI = " + absoluteUri);
        entityRequest = odataClient.getRetrieveRequestFactory().getEntityRequest(absoluteUri);
        request.setAccept("application/json");
        entityRequest.execute();
      } catch (Exception ex) {
        System.out.println("car 10 does not exist");
      }
    } catch (Exception ex) {
      ex.printStackTrace();
    }
  }

  private static ClientEntity loadEntity(ODataClient odataClient, String json) throws ODataDeserializerException {
    InputStream input = new ByteArrayInputStream(json.getBytes());
    return odataClient.getBinder().getODataEntity(odataClient.getDeserializer(ContentType.APPLICATION_JSON).toEntity(input));
  }

  private static void printResult(ClientEntity clientEntity) {
    clientEntity.getProperties().forEach((t) -> {
      System.out.print(t.getName() + ":");
      System.out.print(t.getValue() + " - ");
    });
    System.out.println();
  }
}|
LeanXcale does not yet support arrays for the OData driver. |
4. OpenXava

LeanXcale integrates seamlessly with OpenXava, the open source Java framework, with high productivity, focused on the development of enterprise web applications adaptable to multiple platforms and supports practically all relational databases.
4.1. Register and download OpenXava Studio
OpenXava is free and you can download OX Studio regisgtreing here (or you con use any other IDE like IntelliJ or VS Code).
Go to OpenXava web and register. This can take a few minutes. Once registered, you’ll receive an email with a link to download OX Studio.
4.2. Create a new project
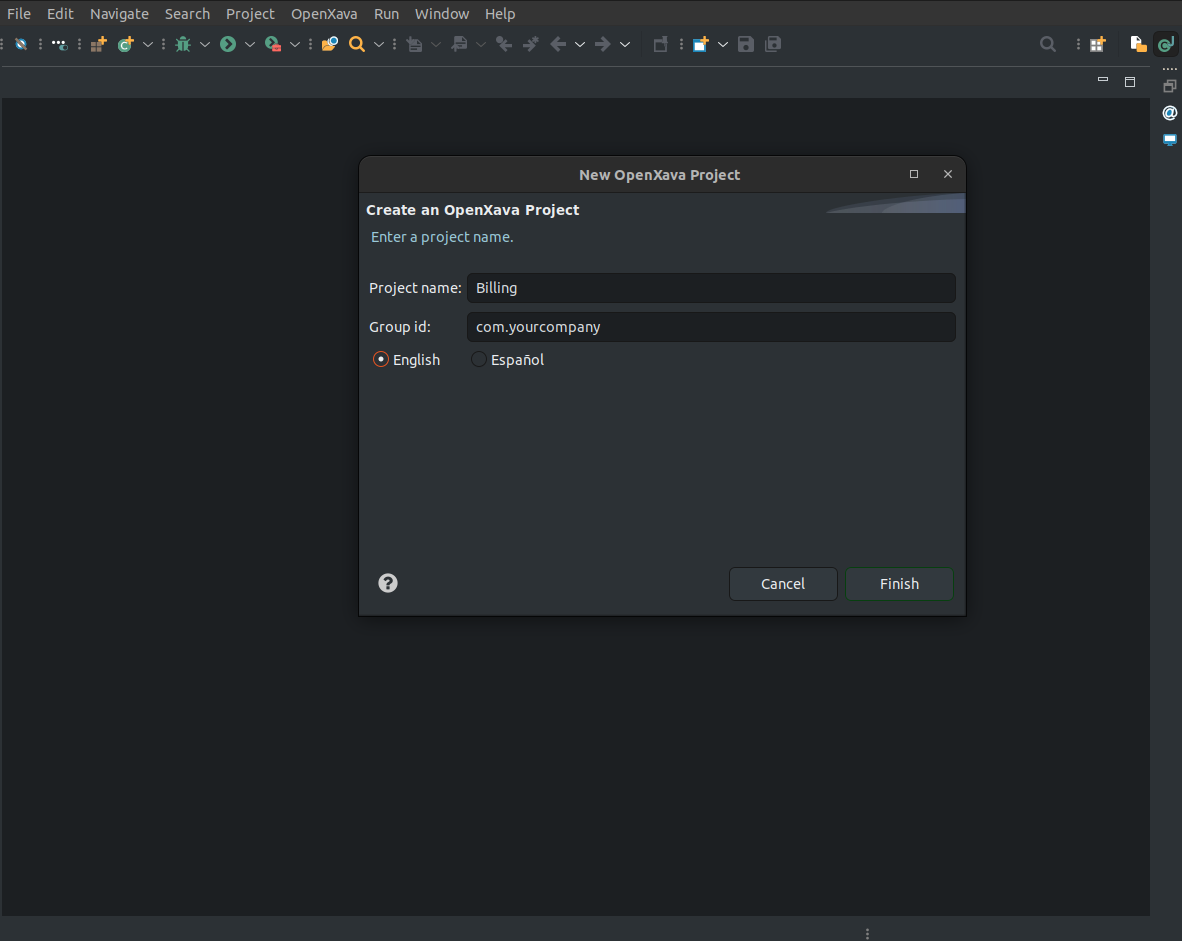
Firstable, click in OpenXava > New OpenXava Project and a pop-up window will appear.
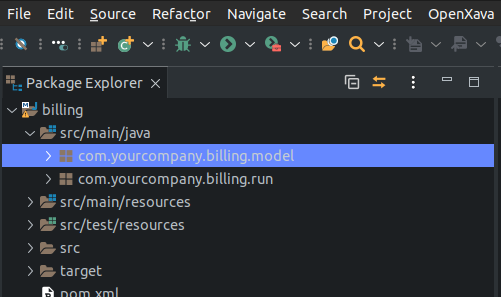
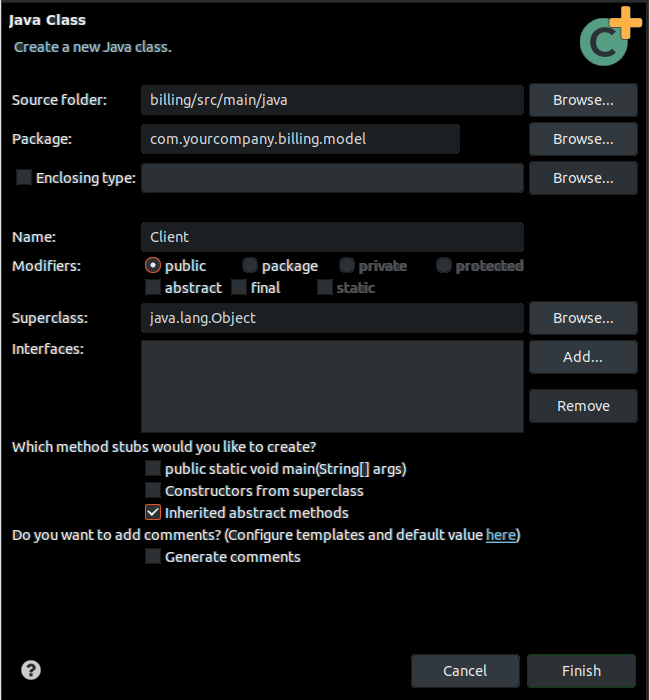
Create a new class Client in the package com.yourcompany.billing.model:
Type Client as class name and click Finish.
Copy following code into class Client:
package com.tuempresa.leanxcale.model;
import javax.persistence.*;
import org.openxava.annotations.*;
import lombok.*;

@Entity
@Getter @Setter accesibles
public class Client {

    @Id
    @Column(length=6)
    int number;

    @Column(length=50)
    @Required
    String name;
}
4.3. Configuring OpenXava for LeanXcale
Edit project file pom.xml, in project root directory. Add the following dependencies inside the section <dependencies>:
<dependency>
	<groupId>com.leanxcale</groupId>
	<artifactId>qe-driver</artifactId>
	<version>1.9.6</version>
</dependency>

<dependency>
	<groupId>com.leanxcale.connectors</groupId>
	<artifactId>hibernate-connector</artifactId>
	<version>1.9.6</version>
</dependency>
In the same file add the following reporitory inside the section <repositories>:
<repository>
	<id>maven-releases</id>
	<url>https://nexus.leanxcale.com/repository/maven-releases</url>
</repository>
Edit project file persistence.xml, located in folder src/main/resources/META-INF:
<properties>
      <!-- ... -->
      <property name="hibernate.dialect" value="com.leanxcale.connector.hibernate.LxDialect"/>
      <property name="hibernate.globally_quoted_identifiers" value="true"/>
</properties>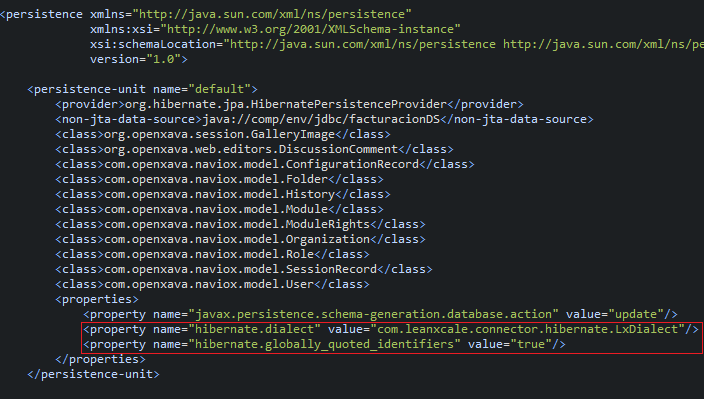
Edit project file context.xml, located in folder src/main/webapp/MEFA-INF:
<Resource name="jdbc/billingDS" auth="Container" type="javax.sql.DataSource"
	  maxTotal="20" maxIdle="5" maxWaitMillis="10000"
	  username="app" password="app"
	  driverClassName="com.leanxcale.client.Driver"
	  url="jdbc:leanxcale://a5357d898f9318f2a75b.lxc-db.com:1522/db"/>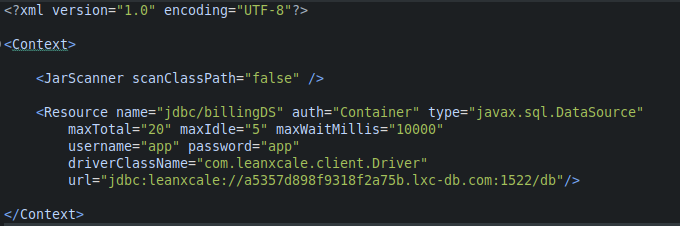
Of course, you need to change those values: username/password (LeanXcale trial version has predefined values as "app"/"app") and url (go to LeanXcale platform to get it).

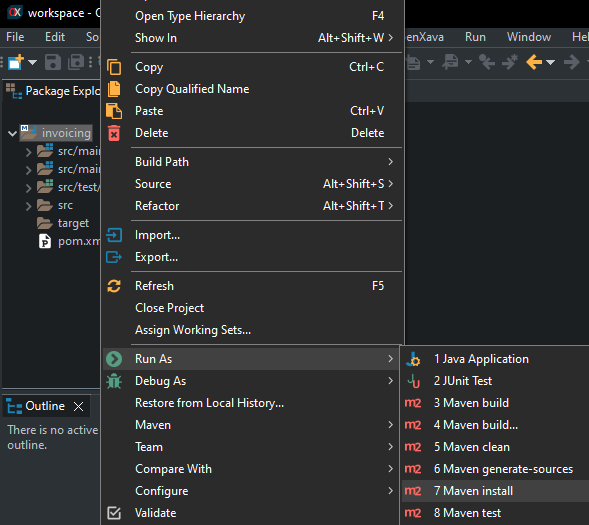
4.4. Rebuild Project
After editing configuration files, you must rebuild your project. In OX Studio, right-click in project and select Run As > Maven install:
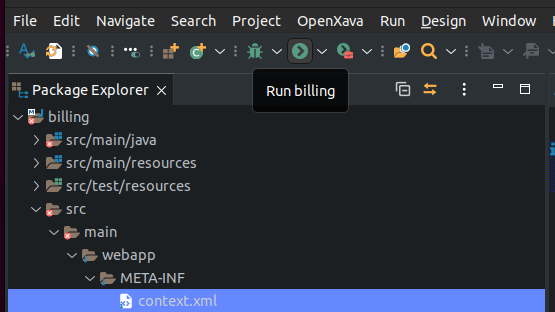
4.5. Run App
Click button Run:
Wait until console shows a message stating app is initiated:
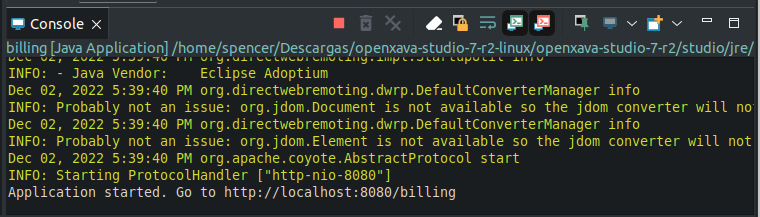
Now, your app is running. Open a browser (Chrome, Firefox, Edge, Safari) and go to URL:
You are entering your app for the first time. Enter admin/admin as user/password.
The left pane will show a list of available modules:
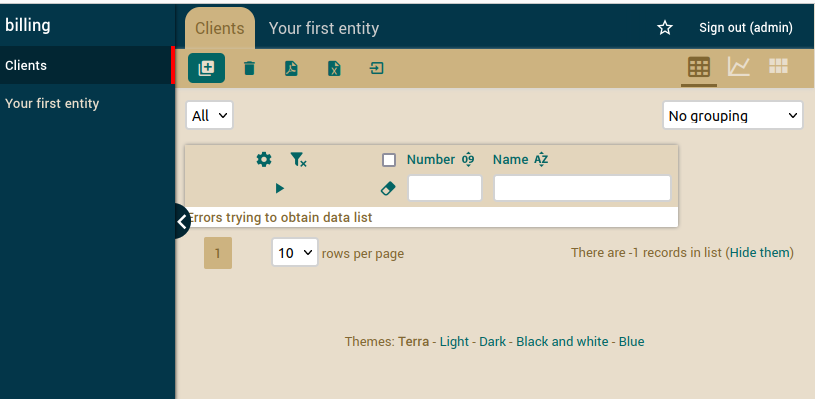
Use module Clients to create new clients; just enter number and name.
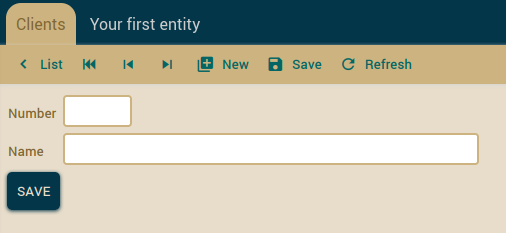
You can see the list of clients you just created.
Congrats !! You have your first OpenXava App working with LeanXcale.